Under-sink cabinet mold can develop fast from a small drip. Particleboard swells, odors start, and hidden moisture spreads to nearby walls and flooring. The sooner you find and fix the leak, the easier and cheaper the repair.
This guide shows you how to spot early signs, what not to do, the safe steps you can take today, and when to call ERX.
🧰 Safety First
- Kill power to outlets inside the cabinet if water touched cords or strips.
- Wear gloves and a mask if you see visible growth or smell a strong musty odor.
- Clear the area of cleaners and chemicals before you start.
Takeaway: safety keeps a simple clean up from becoming a bigger problem.
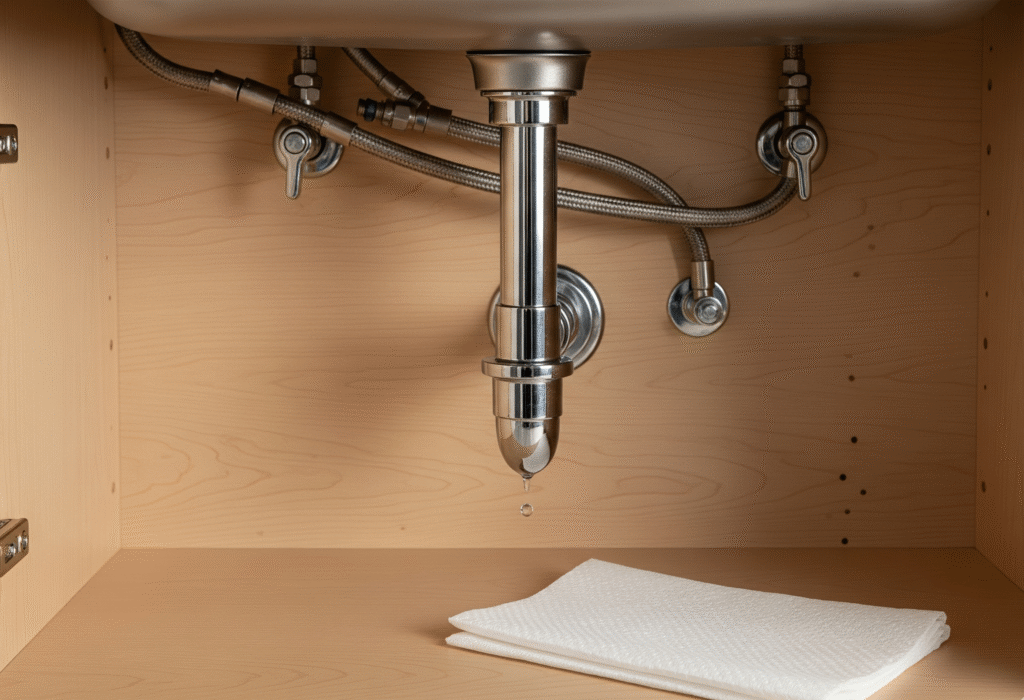
🔎 5-Minute Leak Check
- Run warm water and the disposal for 60 seconds. Look for drips at the P-trap, dishwasher tee, and disposal flange.
- Check supply lines and shutoff valves for beads of water. Move a dry paper towel around fittings to find moisture.
- Inspect the cabinet floor for swelling, bubbling veneer, or dark rings.
- Look at back corners and the toe-kick for discoloration or softness.
- Smell test after you close the doors for a minute. Musty odor means moisture has been present.
Takeaway: multiple clues together mean active moisture that needs correction, not just wiping.
👃 Early Signs of Cabinet Mold
- Musty odor when you open the doors
- Soft or swollen particleboard under soaps or buckets
- Dark speckling on raw wood edges or the cabinet back
- Discolored caulk where counter meets backsplash
- Ants or silverfish showing up near the sink area
Takeaway: odor plus discoloration is your cue to act before it spreads to walls and flooring.
⛔ What Not To Do
- Do not spray bleach inside the cabinet. It does not fix moisture and can damage finishes.
- Do not close doors and let it dry. Trapped humidity feeds mold.
- Do not run fans that blow into the rest of the kitchen if growth is present. That spreads spores.
- Do not paint over active staining without drying and source repairs.
Takeaway: surface wipes will not solve mold if the cabinet is still wet or the leak continues.
🧽 Step-By-Step: Stop Leaks and Dry It Out
- Shut the supply valves under the sink. If a valve leaks, shut the home’s main and replace the bad valve.
- Fix the leak source first. Common culprits are loose compression nuts, cracked P-traps, failed disposal flanges, and dishwasher hose clamps.
- Remove stored items and discard soaked cardboard. Bag and remove materials that smell strongly musty.
- Extract standing water with towels and a wet vac. Get water out of toe-kicks if possible.
- Open the area. Leave doors open. Place a small fan to move air across the cabinet interior and a dehumidifier nearby.
- Clean accessible surfaces with a mild detergent solution. Wipe, rinse, and dry thoroughly.
- Deodorize safely with ventilation and dry-out. Avoid perfumes that mask moisture problems.
- Monitor for 24 to 48 hours. If odors persist or wood stays damp, escalation is needed.
Takeaway: fixing the leak and drying quickly limits damage and costs.
🪚 Save It or Replace It
- Particleboard floors: if swollen or crumbling, plan to replace the affected panel or the entire base.
- Plywood cabinet boxes: often salvageable if dried quickly and cleaned thoroughly.
- Toe-kicks and back panels: cut and replace if swollen, delaminated, or visibly contaminated.
- Adjacent drywall: inspect behind the cabinet if the leak ran down the wall. Soft spots or staining call for removal and drying.
Takeaway: porous materials that stayed wet are more likely to need removal to prevent recurring odor and growth.
📸 Insurance and Documentation
- Take photos and short videos of the leak source and the damage before and after you start drying.
- Note dates and times when you discovered the issue and when the leak was stopped.
- Save receipts for parts, fans, and dehumidifiers.
Takeaway: good documentation speeds claims and keeps next steps clear.
🛡️ Prevent It From Coming Back
- Use braided stainless supply lines and replace old plastic lines.
- Add a drip tray under the cabinet floor or a smart leak sensor with alerts.
- Do a monthly 60-second check while the water and disposal run. Paper-towel test fittings for moisture.
- Keep air moving by leaving doors ajar after heavy use or deep cleaning.
- Store in plastic bins instead of cardboard that traps moisture and odors.
Takeaway: small habits plus quick attention to drips stop cabinet mold before it starts.
🏗️ How ERX Helps
- Source and moisture diagnostics to confirm where water is coming from
- Containment and HEPA cleaning so dust and spores stay out of living spaces
- Drying and dehumidification targeted to the cabinet base, wall, and flooring
- Selective removal and rebuild for damaged toe-kicks, panels, or drywall
- Documentation with photos and moisture readings for your insurance
Takeaway: professional remediation removes contamination and corrects the conditions that allowed it to grow.
📞 When To Call ERX
- Persistent musty odor after 24 to 48 hours of drying
- Swollen or crumbling cabinet floors or toe-kicks
- Visible growth or discoloration beyond the cabinet interior
- Water spread to adjacent walls or flooring
- Unclear leak source or repeated leaks
We are here 24/7 to investigate, dry, clean, and restore your kitchen quickly and safely.
Call ERX now: (866)-217-7903
🧠 FAQs: Cabinet Mold Under the Sink
Q: Do I have to replace the entire cabinet if only one section is damaged
A: Not always. If contamination and swelling are limited, selective panel or toe-kick replacement may be enough. ERX can assess on site.
Q: Can I use bleach to clean cabinet mold
A: We do not recommend it. Detergent cleaning and full drying are safer for finishes and more effective when paired with moisture control.
Q: How fast can mold appear after a leak
A: Odors can start within a day in warm, humid conditions. Visible growth can follow quickly if materials stay damp.
Q: Do air purifiers fix cabinet mold
A: Purifiers can reduce particles in the air, but they do not dry the cabinet or stop a leak. Moisture control and cleanup are required.
For background on mold and moisture, see the CDC mold overview.